
Owning a Shark robot vacuum can transform your home cleaning routine, offering convenience and efficiency with minimal effort. However, as these devices age, their battery performance may decline, leading to shorter runtimes or charging issues. For owners of older Shark robot models, replacing the battery can breathe new life into your vacuum, restoring its ability to keep your floors spotless. This comprehensive guide from First Grade Appliances explores everything you need to know about replacing batteries in older Shark robot vacuums, including how to identify the right battery, step-by-step replacement instructions, maintenance tips, and troubleshooting common issues to ensure your vacuum runs smoothly.
Why Replace the Battery in Your Shark Robot Vacuum?
Over time, lithium-ion batteries in Shark robot vacuums naturally degrade due to repeated charging cycles, exposure to heat, or general wear. This degradation can result in reduced runtime, failure to hold a charge, or the vacuum stopping mid-cycle. For instance, if your Shark robot disconnected from its charging dock prematurely or fails to complete a cleaning session, it might be a sign that the battery needs replacement. Visit this guide for more insights on resolving connectivity issues with your Shark robot vacuum. Replacing the battery is often a cost-effective alternative to purchasing a new vacuum, especially if your model still performs well otherwise. According to iFixit, battery lifespan typically ranges from 1 to 3 years, depending on usage and maintenance, making replacement a practical solution for older models.
Identifying the Correct Battery for Your Shark Robot Vacuum
Before replacing the battery, you must ensure you purchase the correct one for your specific Shark robot vacuum model. Older models, such as the Shark ION Robot RV700 Series, RV750, or RV761, often use specific battery models like the RVBAT700 or RVBAT850. Here’s how to find the right battery:
- Check the Model Number: Locate the model number on the bottom of your vacuum, near the barcode, or in the user manual. This ensures you select a compatible battery.
- Verify the Battery Part Number: Shark’s official website lists replacement batteries, such as the RVBAT700 for the ION Robot R75, which is compatible with multiple models.
- Purchase from Reputable Sources: Opt for genuine Shark batteries from authorized retailers like Shark’s official website or trusted vendors to ensure compatibility and safety. Third-party batteries from sites like Amazon may be cheaper but can vary in quality, with some users reporting issues with non-OEM batteries.
- Confirm Date Code: Some Shark models require a date code, found on the plug prong, to match the correct battery. Entering this code on Shark’s website can help identify the exact part.
Always consult your user manual or Shark’s customer support for model-specific details to avoid purchasing an incompatible battery.
Step-by-Step Guide to Replacing the Battery
Replacing the battery in a Shark robot vacuum is a straightforward process that most users can complete at home with minimal tools. Below is a general guide based on common Shark ION models, such as the RV750 or S87, adapted from iFixit’s repair guides.
- Power Off the Vacuum: Ensure the vacuum is turned off and disconnected from any power source to avoid electrical hazards.
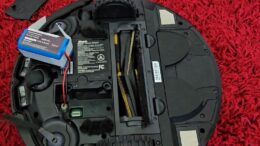
- Access the Battery Compartment: Flip the vacuum over to locate the battery cover on the underside. Use a Phillips screwdriver to remove the screws securing the cover.
- Remove the Old Battery: Gently lift the cover to expose the battery. Hold the plastic tabs on the battery and carefully disconnect it from the circuit by pulling it out. Note the connector’s position for reassembly.
- Install the New Battery: Insert the new battery, aligning it with the connectors. Ensure a secure connection and place it firmly in the compartment.
- Reassemble the Vacuum: Replace the battery cover, secure it with the screws, and ensure everything is tightly fastened.
- Charge the Vacuum: Place the vacuum on its charging dock and allow it to charge fully (typically 6 hours for the first charge) before use.
Always handle the battery with care, avoiding damage to the connectors or exposure to extreme temperatures, as this can pose safety risks.
Maintenance Tips to Extend Battery Life
Proper maintenance can significantly extend the lifespan of your new battery and improve your Shark robot vacuum’s performance. Here are some practical tips:
- Store at Optimal Temperatures: Keep your vacuum and battery in a cool, dry place, as extreme heat or cold can degrade lithium-ion batteries.
- Regular Cleaning: Clean the charging contacts, brushes, and sensors to ensure efficient operation and prevent battery drain.
- Avoid Overcharging: While most Shark models have built-in protections, unplugging the vacuum after a full charge can help maintain battery health.
- Use Eco Mode: For older models like the Shark ION Robot 761, using Eco mode can extend battery life by reducing power consumption.
- Schedule Regular Maintenance: Empty the dustbin and clean filters regularly to reduce strain on the vacuum’s motor and battery.
By following these steps, you can maximize the efficiency of your replacement battery and keep your vacuum running longer.
Troubleshooting Common Battery Issues
Even after replacing the battery, you may encounter issues that affect performance. Here are some common problems and solutions:
- Vacuum Stops Mid-Cycle: If the vacuum stops prematurely, check if the battery is properly connected or if the charging contacts need cleaning. A low battery may also indicate a faulty replacement; consider contacting the supplier.
- Charging Issues: Ensure the vacuum’s manual on/off switch is in the “on” position, as it may prevent charging if accidentally turned off. Clean the metal contacts on both the vacuum and dock to ensure proper connection.
- Short Runtime: If the new battery doesn’t last as expected, verify it’s the correct model for your vacuum. Non-OEM batteries may not meet performance standards. Additionally, calibrate the battery by fully charging and discharging it a few times.
- Warranty Claims: Shark offers a two-year limited battery warranty for defects under normal use. Contact Shark’s customer service at 877-581-7375 with your receipt and product details to initiate a claim.
If issues persist, consult Shark’s support website or a professional technician to diagnose deeper hardware problems.
Cost Considerations and When to Replace vs. Upgrade
The cost of a replacement battery for older Shark robot vacuums typically ranges from $50 to $100 when purchased from Shark’s official website. Third-party options may be slightly cheaper but carry risks of incompatibility or reduced lifespan. Before replacing the battery, evaluate your vacuum’s overall condition. If it’s otherwise functional and meets your cleaning needs, a new battery is a cost-effective choice. However, if your model lacks modern features like LiDAR navigation or self-emptying bases, as found in newer models like the Shark Matrix Plus, upgrading might be more practical. Compare the cost of a new battery to the price of a renewed or discounted model, which can range from $88 to $419 for models like the Shark ION Robot 761 or EZ Robot RV915S.
Read Also:
10 Vacuuming Mistakes You’re Probably Making (and How to Fix Them)
How to Clean and Dry Carpet in The Winter
FAQs
How do I know if my Shark robot vacuum battery needs replacement?
If your vacuum stops mid-cycle, fails to charge, or has significantly reduced runtime (e.g., less than 60 minutes), the battery likely needs replacement. Check for signs of wear or damage and consult your user manual.
Can I use a third-party battery for my Shark robot vacuum?
While third-party batteries are available, they may not be reliable. Genuine Shark batteries, like the RVBAT700, ensure compatibility and safety. Check reviews and model compatibility before purchasing.
How long does a Shark robot vacuum battery last?
A Shark robot vacuum battery typically lasts 1 to 3 years, depending on usage, maintenance, and storage conditions. Regular cleaning and proper charging habits can extend its lifespan.
Is it safe to replace the battery myself?
Yes, replacing the battery is safe if you follow safety precautions, such as turning off the vacuum and handling the battery carefully. Consult your user manual or iFixit guides for model-specific instructions.
What should I do if my new battery doesn’t work?
Ensure the battery is compatible and properly installed. Clean charging contacts and calibrate the battery. If issues persist, contact the supplier or Shark’s customer service for warranty support.
Conclusion
Replacing the battery in an older Shark robot vacuum is a practical and cost-effective way to extend its lifespan and maintain its cleaning performance. By identifying the correct battery, following a simple replacement process, and practicing proper maintenance, you can keep your vacuum running efficiently for years. If you encounter issues like a shark robot disconnected from its dock or persistent charging problems, troubleshooting steps or a warranty claim can help. For those considering an upgrade, weigh the cost of a new battery against the benefits of newer models with advanced features. With the right care, your Shark robot vacuum can continue to simplify your cleaning routine.