How to set different ringtones for different contacts iphone?

How to know if it’s love or lust
April 12, 2021
Vegetable garden at home: The essential for your care
May 1, 2021If you own an iPhone, you have surely noticed the variety of functions that the product offers you. One of these is the ability to customize a ringtone or vibration for each contact, both for incoming calls and messages. The service is very convenient and allows you to know who is calling us even before seeing the display; it’s a great help when you don’t have your phone at hand. So let’s see how to set different ringtones for different contacts iphone.
Table of Contents
ToggleHow to set different ringtones for different contacts iphone?
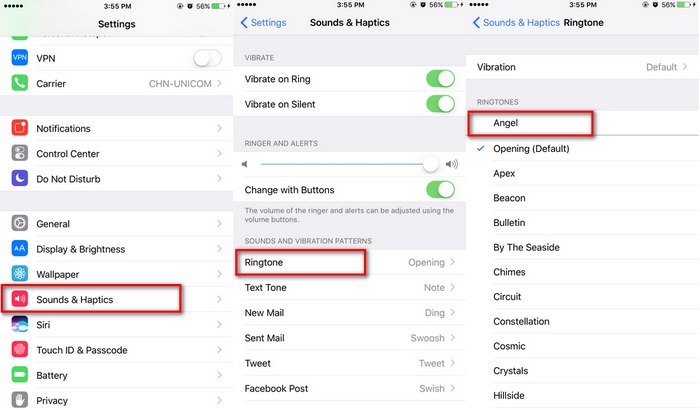
Customizing the ringtone for calls is possible both when you are creating a new contact, and whether it is an existing contact. From the iPhone home page, select the icon to access the address book. Once you have chosen the contact, by pressing the “Edit” button located at the top right of the screen, a series of items will be added to the home screen: scrolling down, you will see the “Ringtone: Default” field. Tapping the arrow on the right will open the page with the list of tones already present on your iPhone model. You can listen to the various melodies and, once you have chosen your favorite, just select the one that seems most suitable for you. To confirm the changes, click the “Save” button and then “
Choose the vibration
In case you would like to benefit from the customization even when the tones are lowered, you can assign a different vibration. The process is similar and just as simple. In this case, once you have pressed the “Edit” button, the “Vibration” item will appear: clicking the arrow on the right will open the list of standard vibrations. After having tested them, similarly to the melodies, you will choose the one you like the most and confirm your choice by saving everything. Read now: how to make a facebook post shareable.
Personalize the ringtone
But if you really don’t like the preset ringtones on your iPhone, or if you want to recognize the sound of your phone ringing even in the midst of confusion, then a solution to customize your ringtone, even more, could be to download, for a fee, ringtones from the official “store”. The prices are not low, unfortunately, but the quality is high. So let’s see how to do it. First, you need to open the Itunes Store app and select the “Ringtones” category at the bottom right. At this point, you can scroll through a rich list of warning tones and ringtones of various kinds. By clicking on the cover image to the left of the title, you can listen to a preview, while clicking on the blue button with the price, to the right of the title, you can buy the song.
Create a ringtone
For the more experienced it is also possible to create your own ringtones by yourself, starting from songs saved on your computer, and to do so you do not need any particular program, except iTunes (which is already installed on Mac and which instead must be installed, free of charge, on Windows devices). The operation may seem difficult, but if you follow these simple steps you will be able to create your own personalized ringtone in a few minutes. The first thing to do, after identifying the song in the iTunes library, is to “shorten” it until it has a maximum duration of 40 seconds. To do this, just right-click on the title of the song and select the Information item from the menu that appears.
At this point, a window will open and you will have to select the Options tab and put the checkmark next to the Start and End items, specifying, in the appropriate fields, the start and end seconds of the part of the song that you want to turn into a ringtone. Now, by clicking on the title of the chosen song, you can select the File -> Convert -> Create AAC version to give the new ringtone the format suitable to make it so. Once the conversion is done, the created ringtone will be present in the iTunes library. However, it is necessary to take a further step: access the folder where the original song file is kept to rename the ringtone file by changing its extension from .m4a to .m4r.
At this point you can delete the created ringtone from the iTunes library, but be careful not to remove the source file from your PC as well. Just missing, don’t give up: connect your iPhone to your computer, select the device icon from the top bar of iTunes, go to the Ringtones tab in the left sidebar and drag the .m4r file of the ringtone you want to copy into the iTunes window. Once this is done you can disconnect the iPhone from the computer and activate your newly created ringtone as we explained in the previous steps.
You may like also: Anime birthday
Customize the vibration
Also, if you are not satisfied with the default vibrations, you can create a new one by scrolling down the page until you see “Create new”. At this point, you can have fun creating them at will, simply by touching the screen and assigning them to different contacts. If you use SMS a lot, following the same steps described for the ringtone and vibration, you can differentiate the sound of the messages you receive. On the contact’s home screen, you will see the “Mess. Ringtone” sections. and “Vibration”. Choose the parameter you are interested in changing and the subsequent steps to set the message tones are the same as previously described for calls.
Customize SMS
If you use SMS a lot, following the same steps described for the ringtone and vibration, you can differentiate the sound of the messages you receive. On the contact’s home screen, you will see the “Mess. Ringtone” sections. and “Vibration”. Choose the parameter you are interested in changing and the subsequent steps to set the message tones are the same as previously described for calls.


